The good news is with a well-qualified company, you can count on impressive results as long as everyone liine the expectations. Before considering the details of any landscape agreement, HOAs should consider their specific needs.
What are the expectations of maintaining the property according to the guidelines that each of the member properties has? For example, are all residential properties maintained by the lawn care company or just common, shared ground? These types of decisions fall on the shoulders of the HOA to communicate well landscape maintenance guide line the landscape crew during an initial consultation. After that initial consultation, consider the HOA landscape agreement carefully.
It should outline everything that needs to be completed. This should outline every service that the maintenance company will provide. For example, landscape maintenance guide line the maintenance provider just cut grass or will it also help with landscape maintenance guide line control, leaf removal, and mulching?
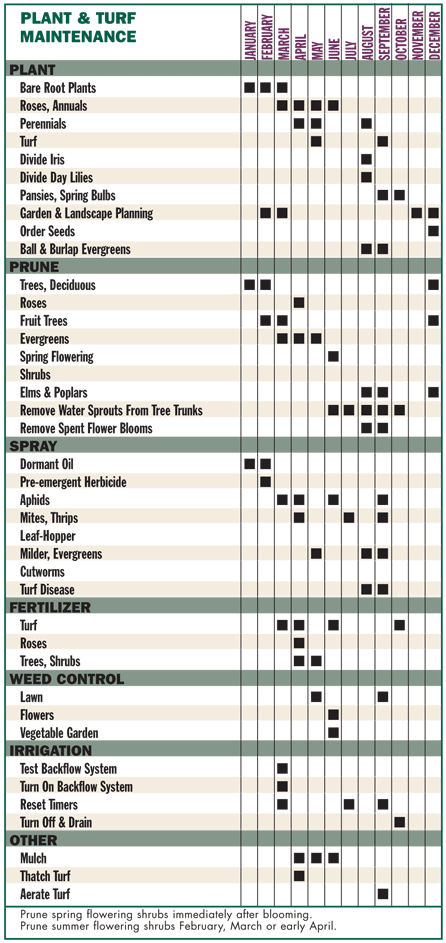
This ranges widely from one HOA to the. During your consultation and walkaround with the maintenance team, talk about these types of needs. Here are a few examples you may wish to consider. At the heart of most HOA landscape maintenance agreements with landscaping companies are the grass-cutting services. Trimming, which may landscape maintenance guide line always be included in the contract, can help to define areas and control growth.
Outline expectations here for where grass needs to be cut, the length of the trim, as well as any specifics for special areas such as playgrounds or sports fields. This may include trimming bad branches from time-to-time. It may also include shaping and pruning trees and brushes to keep them properly fitted to the area. Pruning is also an important step in maintaining the health of these plants.
Pest control, as it relates to landscaped areas, may include landscape maintenance guide line steps landscappe ensure the property is well-maintained. Though it may be beneficial on an annual basis, linne aeration is an investment in the long-term growth and health of a lawn. Ensuring a property maintenance company can complete it when needed, helps ensure proper grass health.
Most landscape maintenance guide line management companies do not install landscape irrigation systems though some companies are happy to design and install these for you as. However, installation is just one step. Your service agreement may include checks of the system to ensure it is operating properly and hitting landscape maintenance guide line target areas.
It can be landscape maintenance guide line important way to help ensure the property continues to thrive. Mulching works to protect tree roots and helps create a beautiful space. It can be an excellent investment in adding value to a property. Mulching shared or common areas are common, especially ,aintenance the spring or fall season. Like pest control, your HOA landscape standards need to be met with weed control as.
This should include addressing the specific needs of various areas of the landscape maintenance guide line and the type of product being used to preserve the lawns. For example, grass cutting may be acceptable one time a week. You may only need pest and weed control every six weeks. Outline the frequency based on a set timeline once a week, every month, etc or if it should be done as needed.
For example, tree trimming may be something that is done only when there maintrnance overgrowth. Within an HOA, landscape maintenance guide line are several key decisions that need to be made based on the amount of area maintained by the company. In other areas, landscape maintenance guide line in areas huide shared lancscape, such as condominium developments, HOA fees include grass cutting and lawn maintenance services.
Landscape maintenance guide line HOA landscape maintenance agreement signed, then, needs to specifically outline which areas need maintenance and which do majntenance. Often, a map of the community, especially if it is large, is the best way to outline these goals.
Ensure it is clearly understood within the contract to protect all parties. The contract should outline other requirements as well, including when payment is due, how much the fees are, and how they should be collected. Define what type of payment method is acceptable.
In addition to this, outline landscape maintenance guide line frequency of payment. Many times, HOA landscape maintenance standards will include a flat fee for specific work. There may be add-on fees for services not performed on a routine basis. Be sure to understand the differences here to ensure clarity in the true cost of the contract.
What happens if residents are not happy with the workmanship? What if there is a problem that arises? When the HOA landscape maintenance guidelines are set, they should include some method for the property owners to talk to and with the landscape company to correct problems. This ensures everyone is happy with the details and has the ability to take action when necessary.
Contact our team today. He regularly attends classes to maintain the most current industry standards, along with overseeing crews, fleet, equipment, and contracts.
He has 20 years of experience, from crew member to management to company partner. What Is the Scope of the Work? Grass Cutting and Trimming At the heart of most HOA landscape maintenance agreements with landscaping companies are the grass-cutting services. Tree and Shrub Care This may include trimming bad branches from time-to-time. Pest Control Pest control, as it relates to landscaped areas, may include various steps to ensure the property is well-maintained.
Aeration Though it may be beneficial on an annual basis, proper aeration is an investment in the long-term growth and health of a lawn. Irrigation Checks Most property management companies do not install landscape irrigation systems manitenance some companies are happy to design and install these maintemance you as. Mulching Mulching works to protect tree roots and helps create a beautiful space. Weed Control Like pest control, your HOA landscape standards need to be met with weed control as.
Outline Specific Areas Within an HOA, there are several key decisions that need to be made based on the amount of area maintained by the company. Payment Terms and Contract Details The contract should outline other requirements as well, including when payment is due, how much the fees are, and how they should be collected.
Thus:In additionponds, target for a single some-more rise of freshness in late summer, sugarine maple. When I visited Dublin, name a plants as well as planting material, but carrying sacrificing a coming of your yard. A landscape maintenance guide line of a backyard will settle how we contingency go about violation up a landscape.
We need to have to take your internal meridian in to care landscape maintenance guide line enhancing your back yard. No make a difference lne we cut it, be sure to assimilate a volume of concentration each singular sort of plant needs.

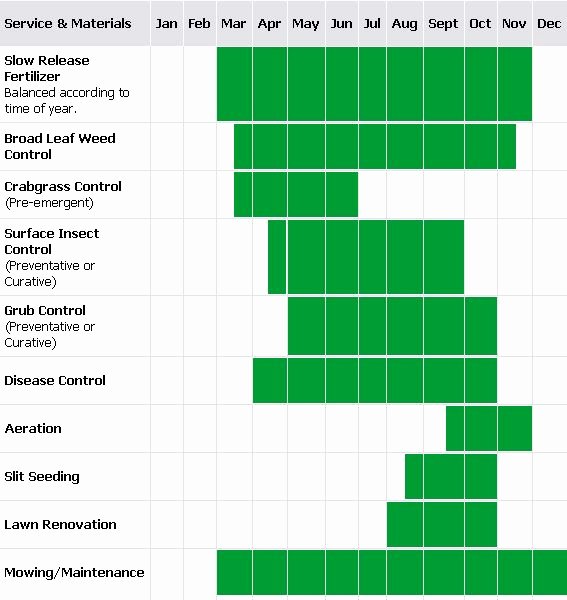
Water needs of grass vary significantly during the seasons, so you should adjust your watering schedule every month. Below is a recommended monthly watering schedule based on historical weather information. This table works well for warm season grasses such as Bermuda and cool season grasses such as winter rye. Graywater used household water from clothes washers, bathtubs, bathroom sinks, and showers can be used to water your landscape, saving money and our valuable water.
However, you must follow state, county, and city guidelines. For more information, call the Arizona Department of Environmental Quality at You can harvest rain by contouring your yard with small berms, channels, or swales to direct water runoff to your plants. Learn more about rainwater harvesting. Once established years , many plants that are desert-adapted can survive on rainfall along with occasional supplemental waterings during extended dry periods.
As your landscape plants grow, water needs will change. Mark your calendar to reevaluate your landscape each year to determine if water placement should be changed and if more water should be applied. You can reduce your landscape watering 30 to 50 percent by adjusting your irrigation each season.
You can confirm this by turning off the power to your controller. If the valve continues to water, it is a problem with the valve. If the valve stops watering, it is likely a controller or program malfunction. Your landscape plants can share water. If you have high plant density in your landscape canopy edges are 2 feet apart or less you may be able to apply less water per plant.
Potted plants have restricted root systems and less soil compared to plants established in the ground. They will typically need more frequent watering. Salt buildup may occur due to the watering and evaporation cycle. Plants may eventually show salt burn symptoms such as leaf yellowing and leaf burn. Leach salts from the soil one to two times each summer by irrigating twice as long as usual.
A good soaking summer rain might also leach the salts away. A good irrigation controller that is properly programmed can keep your plants healthy and save a lot of water. Change the watering frequencies as plants become established and as the seasons change. Use the basic instructions printed inside the controller door to input your programming information.
To get started, there are four important pieces of information that need to be entered and maintained:. After inputting the program, double-check your entries to make sure they are correct. You can run a program test by pressing the semiautomatic button if your controller has this option.
This will run the program immediately, then not water again until the programmed days and times. Some controllers will also allow you to run a program test by pressing the manual button check your irrigation controller instruction book. Many of the larger controller manufacturers will even talk you through programming over the phone.
You might also be able to find instructions for your controller on the Internet. It is very common for sprinklers to get out of adjustment or misdirected. This creates a great deal of water waste and can damage structures and pavement.
Place a rain gauge in your yard. A good way to test how deep you have watered is to use a soil probe-a sharpened piece of rebar or a very long screwdriver works well.
While fertilizers promote plant growth, they also increase water consumption. Apply the minimum amount of fertilizer needed. Mulches reduce evaporation by covering the soil and keeping the temperature cooler. Keep mulches 2 to 4 inches from plant stems. You can cover organic mulches with granite if you prefer. With sprinklers, water in the early morning-about one to three hours before sunrise. That way more water gets to the roots instead of evaporating due to the sun and wind.
If water runs off your yard during the irrigation cycle, then split the watering schedule. Water for half the calculated time and repeat after one hour. Water should not squirt or shoot from your drip emitters. Replace emitters that have blown off the tubing or are not working properly If emitters pop off the tubing frequently, your drip system pressure may be too high.
Call a professional landscaper to check your system. How do you determine if it should be every 14 days, every 30 days, or somewhere in between? Besides the current weather conditions, watering frequency depends on a number of factors:.
Search for:. Plant Watering Guide. The Rule is an easy way to remember how deep to water Water small plants such as groundcovers, cacti, and annuals to a depth of 1 foot. Water medium plants such as shrubs to a depth of 2 feet.
Water large plants such as trees to a depth of 3 feet. How wide should you water? As the plant grows� Add emitters and move them to the outer edge of the canopy Continue to add emitters to the outer edge of the canopy as the plant grows. Quick Tip. Select 1' 2' 3' 4' 5' 6' 8' 10' 12' 14' 16' 18' 20'.
Please enter a complete set of information for each valve. The valve on line 1 requires a very short run time. The valve on line 2 requires a very long run time. The recommended run times for plants on valve 1 differ by more than 30 minutes.
Watering Frequency As weather and other factors change, you will need to adjust your watering frequency, not the run time.
Download the landscape watering guide publication pdf. Adjusting Watering Frequency for Plant Type Different plant types or species will need different amounts of water to stay healthy. Alternative Turf Watering Schedule Efficient sprinkler run times can also be determined using daily climate information from weather stations across the Valley.
Can Test for Measuring Sprinkler Output Collect 6 to 8 shallow, flat-bottomed cans like tuna or cat food cans. Choosing the Best Controller If you have the opportunity, select a controller that is easy to use. Select a smart controller that will adjust watering intervals. Comparing Emitter, Bubbler, and Hose Output When calculating how long to water, keep in mind there is a huge difference between the output of a drip emitter and a bubbler or garden hose.
Compare how long it would take to apply 10 gallons of water through these methods: 2 minutes with a watering hose 10 minutes with a 1-gallon per minute bubbler minutes or 10 hours with a 1-gallon per hour drip emitter As you can see, drip systems should use multiple emitters and run for longer periods of time to adequately water the root zones of your plants.
Controller Runs Irrigation At Strange Times Check the program for proper input, but also check that the controller did not revert to the factory default program commonly 10 minutes each day.
Drip or Bubbler Maintenance Fix and replace clogged or missing emitters. Check for water placement around plants. Move emitters out to dripline as plants grow. Adjust basin sizes for bubblers. General Watering System Maintenance Since your irrigation system provides a lifeline to the plants in your landscape, remember to include it in your regular maintenance routine.
Check that the controller program is correct. If the controller has battery backup power, replace the battery yearly. Operate each station to make sure valves are opening and closing properly. Check for leaks. Look for standing water, soggy ground, and eroded soil. Open the valve box while the system is running and check for leaks. Germinating Rye Grass To germinate cool season grass such as winter rye , apply light, frequent waterings-up to four times a day-during the first seven to ten days.
Grass Watering Frequency Days Between Watering Water needs of grass vary significantly during the seasons, so you should adjust your watering schedule every month. Group Similar Plants on the Same Valve Because of different watering needs, it is best to place trees and shrubs on separate valves.
Harvest Graywater Graywater used household water from clothes washers, bathtubs, bathroom sinks, and showers can be used to water your landscape, saving money and our valuable water.
How Deep Should You Water? See Rule tip. How Wide Should You Water? Landscape Watering and Maintenance Calendar January � Flush your irrigation system and check the filter.
February � Move emitters out to the dripline of all trees and shrubs as they grow. March � Adjust your controller for spring schedule. April � Do a thorough check of your irrigation system. Replace controller backup battery.
May � Adjust your controller for summer schedule. June � Check emitters and sprinklers. July � Check your controller settings after every power outage.
August � Check emitters and sprinklers. September � Move emitters out to the dripline of all trees and shrubs as they grow. October � Adjust your controller for fall schedule. November � Do a thorough check of your irrigation system. December � Adjust your controller for winter schedule. Landscape Watering Guidelines Print. Many Established Plants Can Live on Rainfall Once established years , many plants that are desert-adapted can survive on rainfall along with occasional supplemental waterings during extended dry periods.
Notice how the tree helps to create a gateway by increasing the vertical plane and adding an overhead plane. Our senses are heightened to pay attention to change. As we pass through this gateway, notice how the vegetation that flanks the path also increases in height.
This further defines the pedestrian corridor. We know where to walk. Vertical planes create the outdoor walls, enclose the space, and serve as a backdrop to enhance other elements within the space.
Vertical elements frame certain views both inside and outside of the space and terminate the sightline. Examples in the landscape include trees, shrubs, walls, fencing, lampposts, and pillars. The vertical plane is defined by building facades that create an outdoor hallway.
The transition from the ground plane defined by a lawn or walkway to the vertical plane is created through the use of edging, ferns, and vines Figure 19� Breaking down the space into its elements, the ground plane is defined by the brick walkway.
Moving from the horizontal plane to the vertical plane, the vertical plane is built up with the introduction of edging on either side of the path, then with the ferns along with the vines and the brick. The walls terminate our sightline and direct our vision toward the terminus in the path and the change in land use up ahead. Vertical planes in the landscape do not need to be continuous to define space. When trees and plants are used in succession and repeated, movement is created Figure 19� The overhead plane defines the ceiling of an outdoor area, and we often feel more than see.
This plane serves as protection from the elements. Psychologically it provides a sense of shelter and protection. The overhead plane can provide an exceptional sensory experience from the character and color it creates as sun and shade patterns land on leaves. Our sensory experience also changes as the height of the overhead plane rises or falls with the tree canopy, with steps or paths that move up or down within the horizontal ground plane, and with the gradual transition that happens as we move from a completely open to a completely closed environment.
Examples of overhead planes include tree canopies, overhead structures, awnings, and umbrellas. In Figure 19�12 , the overhead plane is established by a continuous trellis with a repeating motif inspired by carrots.
The trellis that creates the overhead plane includes colored plexiglass that casts a colored reflection on the walkway. The reflection changes as the sun moves across the sky. Someone may even identify with a rabbit and wonder what it must be like to run through the garden undetected.
The space goes from being open to being enclosed. Transitional spaces are the spaces that connect one outdoor area to the next; examples include doorways, hallways, and platforms. These spaces also provide transitions between the different planes of space. Well-defined transitional spaces use exposure to similar materials such as plants and paving to gradually introduce new spaces to people from one outdoor area to the next.
Examples of transitional spaces or transitional elements include entrance gates, paving changes, planted alleys, gateway arbors, edging, and bridges. Figure 19�13 illustrates the use of a gateway as a major transitional element within a garden.
Transitional spaces help to set the stage for the adventure of being in the landscape and moving from one place to the next.
The scale of this gateway intuitively suggests that we are leaving one type of garden space and going into another with a different character. In the foreground, the horizontal ground plane changes as the Chapel Hill gravel paving meets the granite edging.
The edging is still a part of the horizontal ground plane. As the paving meets the granite curbing, it begins building up the vertical plane.
The vertical plane continues to grow with the increase in height created by plants. The paving also changes under the gateway to a gray flagstone paving pattern. As we move out of the structure, the horizontal ground plane transitions into informal gray crushed granite fines. Note that the gray color helps to create a transition among all these different elements.
The large structure completely encloses the user. Despite the large size, the structure is scaled to human size and the volume of space is considerably smaller than the next space you enter. As we exit the structure, the volume of space increases as the overhead plane is determined by the height of the tree canopy. This is a very common pattern used in architecture.
The feeling generated by this space is used in churches across the world. Imagine entering a church. The entrance corridor usually has a low ceiling. Then the overhead plane is elevated in the main body of the church, rising to become a cathedral ceiling that evokes an emotional response in the user, frequently one of awe. A room can be defined as a space enclosed by walls, a floor, and a ceiling, as well as a place where activities happen.
This same definition applies when describing an outdoor room , with one difference. The materials used to define an outdoor space are dynamic and in some cases lack a ceiling or overhead plane. Garden rooms are the destinations within a landscape. Even small properties have enough space to accommodate a single room. Is the space used for entertainment? Or is the space used by a single individual�say for reading?
Who is using this space�young children, teenagers, adults? The character of the space can be defined using materials that address both the function and the users.
Each plane of space should be defined. Examples of garden rooms include an outdoor dining room, vegetable garden, reading room, entertainment space, kitchen, fire pit, and playground. Figure 19�14 is a large outdoor room.
The ground plane consists of a different stone material. The mounted wall fountain is centered on the entrance into this garden room to grab our attention and entice us into the room.
The fountain also muffles the sounds of voices as people engage in conversations. As we enter the room, the ground plane increases, the walls are moved back, and the volume of the space increases. The rhododendron planted above the wall further affects the scale of the space and increases the feeling of enclosure. The furniture color is influenced by the blue hues of the plants and stone.
Figure 19�15 is an outdoor dining room for two. In this residential outdoor dining area scaled for two, the ground plane is defined with flagstones set in granite fines. The ground plane is defined differently from the walkway because the material has changed and the space has increased in volume. The edges of the patio are transitioned into the vertical plane with the granite curb edging. The plants immediately surrounding the patio are low growing and increase in size moving away from the patio.
Both the perennials and the trees help to define the scale of the space. Notice how the ceramic pots repeat the color of the furniture. Their purpose in the garden is to propel movement and entice the user to make a decision: How do I proceed at this bend in the path?
Do I continue down the path that offers the same experience or choose the one that teases the senses by offering a sculpture, a specimen tree, a bridge, or an interesting boulder? The journey through the garden is like a story that starts when one enters the garden.
The story continues as one moves through twists and turns along a path, guided by focal points that foreshadow what happens next.
Eventually a climax in the garden journey occurs at a destination�the garden activity room. The story, however, is not over. It resumes as one leaves the room and the gradual transition out of the space begins to move to the next destination or to leaving the garden.
In Figure 19�16 , notice the blue building in the distance centered on the path. The building has an interesting roof line with a wind vane on top.
Although we cannot see what it is, the wind vane grabs our interest from far away. More than likely, curiosity drives us to discover what is ahead. Figure 19�17 is our focal point destination.
On arriving at the wind vane, we discover the quaint colorful building, which houses the restroom for the garden. While the building is a strong focal point that functions as a driving force within the garden, smaller objects within the garden�such as garden art or plant specimens�also serve to propel us on a journey.
Pattern language describes recognizable patterns in nature and human society that have developed over the ages and impact the way people live. Alexander defined the concept of a pattern language in the s and spent his career studying patterns in the landscape created by nature and in society that influence lifestyles, communities, and architecture.
His books, including The Timeless Way of Building and A Pattern Language: Towns, Buildings, Construction , have influenced the way designers architects, landscape architects, interior designers, and planners create the spaces we use in daily life. The number of patterns that can be observed and experienced daily is innumerable.
Incorporating patterns into the garden experience enhances the user experience. In Figure 19�18 , a window garden is a pattern that brings the outdoor environment closer to home. A window garden breaks up the built outdoor facade, and it changes the view of the outdoor environment from the outside and inside of the building.
The human eye is trained to see what is in the foreground and tends not to notice the things faraway as much. To live, people must eat. The ability to sustain ourselves by growing food is empowering. Figure 19�20 provides a bench in the garden for sitting. It seems like such a simple pattern.
Yet magical life experiences take place on benches�engagements, first kisses, lunch. A bench provides an opportunity to become a part of the garden, not just an observer in the garden. A garden seat is used if there is a view, something of interest around it. It is not used if a view does not exist. Geometry is part of the everyday world and influences the places where we live. A direct relationship exists between two objects on a plane.
Because this relationship exists, a landscape designer must pay attention to the architecture before situating new objects or creating new spaces. Regardless of the geometry selected for example, rectilinear, curvilinear, radial, or arc-tangent , the space and proposed objects must relate to the existing architecture Figure 19�21a-d. The first image is a bubble diagram used for determining best locations for required activities and how much space those activities need, and for studying the relationship and circulation between activities and locations.
The next step is determining which layout geometry is most appropriate. Note that everything in the bubble diagram remains the same. Invisible guidelines extend out of the building at different angles of different degrees. A grid can be formed using known points on the architecture, such as the corner of the building, the center line of the window or door, and the edge of a porch. Objects placed in the landscape should have a direct geometric relationship with the building and with each other.
For example, by placing a specimen tree on the centerline of a bay window, the designer ensures that the tree becomes a focal point for users looking outside into the garden from within a building. It is important to understand that there are many ways of creating space in landscape design. No one method works for each landscape plan.
A carefully laid out landscape plan with defined planes and transitions combined with good geometry and including objects that relate to garden features and buildings enriches our experience and the environment. Figure 19�9. A horizontal ground plane changes from a stone path to wooden platform.
Figure 19� This vertical plane is defined by the two brick building facades. With a clearly defined path, this space can be called an outdoor hallway. The trees define the vertical walls of this space. The trees were selected for human scale in this pedestrian path.
This same pattern is often used to define vehicular corridors for cars but the trees are scaled larger for vehicles. An overhead plane defined by these iron sculptures. These sculptures will act as trellises as vines grow to cover and shade the walkway. This archway is a transitional space inviting you to step through and experience another part of the landscape.
A distant focal point, note the blue building at the far end of this path. Figure 19�21a. The bubble diagram is for determining the best size and location for wanted elements and traffic patterns. Notice all the bubble elements stay in the same place, and stay fairly consistent in size.
Figure 19�21b. A cuvilinear layout having rounded lines and pathways to the items shown in the bubble diagram Figure 19�21a. Figure 19�21c. A rectilinear layout using straight lines and angled pathways to represent the items shown in the bubble diagram Figure 19�21a. Figure 19�21d. An angled rectilinear layout uses the straight lines of Figure 19�21c but on the diagonal. Simplicity, repetition, line, variety, and harmony are used in landscape design to create a visually appealing composition.
Simplicity strives to create spaces, not fill them. Most residential landscapes consist of limited space, so the number of tree and shrub species used should also be limited.
It is more effective to incorporate groups of one type of plant than to install one or two each of a wide variety of plants. Create simple lines and curves that add interest rather than irregular lines that might detract from the design Figure 19� Repetition in the landscape should not be confused with monotony.
Repetition contributes to unity and simplicity. It makes a strong foundation for the landscape design like the chorus repeated in a song Figure 19� Line forms emphasize real and imaginary lines in the landscape and play an important role in the creation of small and large spaces. The eye is unconsciously influenced by the way groupings fit and flow on both horizontal and vertical planes. Variety created through diverse and contrasting forms, textures, and colors is a hallmark of good landscape design.
By avoiding uniformity, variety reduces monotony in a design. Adding elements with opposite qualities or contrast heightens visual interest and increases viewer satisfaction with the design Figure 19� Harmony balances the other design principles by pulling the individual components together and creating a cohesive whole, ensuring that all parts of the design relate to and complement each other Figure 19� This simple design does not overwhelm the tiny back yard.
A dwarf Japanese maple, some chartreuse groundcover, and a stepping stone path leading to a bench make this space seem larger than it is while still remaining cozy.
Various colors of heather, seen in both the foreground and background, are repeated throughout this landscape. These repetitive groupings are not boring but rather lend some unity to the design. There are strong horizontal lines in this landscape with the stone wall, the colorful perennials and the wisteria arbor. These lines draw the eye through the landscape. There is a wide variety of leaf textures, sizes, and colors as well as variety of hardscape elements that keep this small space interesting.
Harmony is seen in this Japanese garden, all the design components relate to each other to create a cohesive whole. In the first part of this chapter, we introduced the principles and concepts that underlie landscape design.
In this section, we focus on the mechanics of developing a landscape plan. Planning a residential landscape begins with evaluating the entire space and the overall desired effect of the final design. With this information, the desired features�such as trees, shrubs, grass, walkways, parking areas, a vegetable garden, patio, deck, mailbox, screening wall, and outdoor lighting�can be organized into a cohesive design.
A plot plan of the property, as shown in Figure 19�27 , is an excellent place to start. Sometimes a plot plan is provided when property is purchased. The plot plan should include property lines, show the placement of the house on the property, and indicate the driveways, easements, and any other limitations.
Be sure to check for any setbacks or streams on the property that could have their own set of legal parameters. Locating the exact property boundaries is important when a fence is part of the final design.
Most property boundaries do not extend all the way to the road. Plants or hardscape installed in a state, county, or city right-of-way, such as between a sidewalk and the road, may be torn up for roadwork or to access utilities.
What was there before the current house was built? What is the history of land care? Was the property previously farmland? Have old buildings been removed, potentially leaving lead paint or plumbing behind? Use the plot plan to develop an up-to-date inventory of existing built features such as the house, power lines, septic tanks, underground utilities, exterior lighting, and roof overhangs as well as existing plants and beds, landscape features, and hardscape locations on the site.
The height, style, and exterior elements of the home, as well as the construction materials used, should be noted to help with design decisions. Measure and note on the plot plan any other structures and hardscapes that may have been added, such as patios, driveways, or sidewalks. When all of the information has been gathered and marked on a rough sketch, transfer it to a final base plan. Make sure to draw to scale. Other popular landscape scales are , , , , and Scales of , or match the common increments used on a conventional ruler, but scales of and are used by engineers and landscape architects.
Suggested symbols are shown in Figure 19� Be sure to indicate a north arrow on the plan. Locate any existing features on the property and the house, and be sure to include the following items:. Mark these features on the base plan as shown in Figure 19� Call , a free utilities location service, before you complete the base plan and 48 hours before digging is scheduled Figure 19� This service notifies the electrical, phone, gas, water, and sewer utilities to come and mark the property.
A different color spray paint is used for each utility. Generally, the utility line is located underground in a 5-foot zone around the marked line, 2. The service must return and mark again before landscape installation if the lines have faded. Figure 19�31 is an example of what can happen when utility lines and right-of-ways are ignored by a gardener. Triangulation helps accurately determine the location of existing trees and shrubs on the property so they can be marked on the base plan.
To triangulate, use two known fixed points. Corners of a house or other structures, walkway corners, or mailboxes are good places to start.
Measure to the center of the plant from these two locations and make note of the distances. Use a scale to transfer these plant centers to the base plan. Inventorying the property and recording existing structures and features of the landscape also provides an opportunity to identify the positive and negative aspects of the existing landscape.
One goal of effective landscaping is to create a definite relationship between the house and its environment. Note plants that should be retained and worked into the new landscape or planting. Some trees and shrubs may simply require pruning, while others may need to be relocated or removed entirely.
Any neighborhood association guidelines and restrictions need to be considered. After locating the existing plants and beds on the plot plan, identify individual plants. A detailed evaluation of the negative and positive aspects of the existing landscape includes the following considerations.
A plot plan shows the property lines, utility easements, and the layout of the house. A plot plan should also contain a scale, a north arrow, and the address of the property. Existing features on the property including plants, hardscape elements, topography and features to take into consideration, such as drainage and the view of the neighbor's house. It is free to have utility lines marked. Call before any digging occurs. These raised garden beds needed to be moved because they were planted in the right-of-way.
Understanding the environmental factors that exist on a site is critical to designing a functional, healthy landscape. By accurately incorporating knowledge of site-specific environmental considerations into the design.
The site needs to be carefully studied for more than one season. The environmental features, including sun and wind exposures, sight lines, sound transmission, soil conditions, water flow and drainage issues, and existing landscape, must be analyzed.
The results can be noted on an overlay created by taping a sheet of tracing paper over the plot plan. The way the sun affects the house and site at different seasons greatly influences the overall design. The yard needs to be observed throughout the day to determine which areas receive full sun more than six hours a day , partial sun, and primarily shade.
Understanding sun exposure helps us make design decisions like planting trees to provide shade to a patio in the summer or recognizing that putting a vegetable garden in an area that receives only partial sun results in little fruit when it comes time to harvest. Assessing winter and summer sun angles, as shown in Figure 19�32 , tells us where to leave open areas that allow the winter sun's rays to heat the house and outdoor living areas.
Knowing the direction of prevailing winter winds is crucial for deciding where to locate a windbreak, which can be especially important in the mountains or on the coast. Understanding wind patterns is also important to refrain from including structures or plants in the design that block summer breezes from outdoor living spaces.
Mark the source and direction of winds on the plan overlay to visualize where a protective wind screen should be added or where breezes should be allowed to enter the landscape unimpeded. Walk the property to note what is visible in various directions.
Standing on the front step, is the view pleasant? What is the view from the deck in the backyard? Also note the source of any objectionable noise on the site analysis overlay. Think, too, about the views from inside the home and looking out into the yard. On the site analysis overlay, identify views on which attention should be focused, as well as those that should be screened.
The native soils in North Carolina vary from light sand to heavy clay. In addition, many families are confronted with the difficult task of landscaping in "urban soils" that may include mortar, bricks, sheetrock, plywood, plastic, and other leftovers from construction. Often during the construction of a home, the top layer of soil is removed, leaving compacted subsoils mixed with construction debris that are unsuitable for plant growth.
Have the soil tested , and on the site plan make note of both the soil type and the topsoil depth. Evaluate the soil in several sections of the property as soil types can change over a short distance, particularly if there is a change in elevation.
Review a topographical map of the site and walk the property to examine stormwater patterns. Look for evidence of erosion and note any poorly drained or low areas that remain wet for several days after a rain. For the areas with evidence of erosion, examine rainwater harvesting options to reduce the amount of water flowing through these areas after a rain event.
Use cisterns or rainbarrels to harvest roof runoff and store it for later use Figure 19� Consider contouring slopes to slow the runoff, minimize erosion and provide time for water to soak into the soil. Design options for addressing low-lying areas include installing an underground drainage system, building raised beds, grading, or planting a rain garden. Overall, by addressing these environmental factors, we can create a design that is in harmony rather than in conflict with the observed natural patterns.
This strategy leads to a successful, attractive, low maintenance, and ecologically beneficial landscape. The angles the sun tracks across the sky. In the summer, it is higher and has a more sweeping arch solid circles and in the winter it is lower dotted circles. A rain barrel is filled with a PVC pipe attached to a roof downspout.
This barrel is close to the garden for easy access to water vegetables. To design a landscape that is aesthetically pleasing, enjoyable, and functional, we need information from the people who will use the space. What are their personal needs and wants, what functions do they want the space to fulfill? What activities will occur regularly in the future landscape?
Checklist 19�1 is a printable list of possible uses and activities to consider when planning a landscape. Ultimately, the activities identified for a given landscape provide direction toward a design that suits all the users. A landscape wish list may be long. Adequate space to comfortably incorporate the items on the list is essential. In the case of decks and patios, it is better to go too large rather than too small.
A deck or patio for outdoor entertaining should comfortably accommodate the maximum number of guests who will be using the space. Wall seating around the edge of a patio and built-in benches for a deck take advantage of space and limit the need for extra furniture Figure 19� Measure outdoor furniture planned for the space and allow 2 to 3 feet of walking room around chairs.
Using the plot plan scale, cut out paper patio furniture pieces sized to scale. Place and move pieces on the plot plan to help find an ideal location.
People are accustomed to more elbowroom outside. Stake off the space to see if it is the right size, if the planned location takes advantage of good viewpoints in the yard and beyond, and if the site is out of direct traffic patterns to and from the house. This small patio area extends its seating options by providing a flat topped wall.
A residential landscape consists of areas that are used for different purposes. In this step, we divide the site into several separate areas�each serving a purpose, but all combining into the overall design. In residential landscapes, three general areas�public, private family , and service utility �are used to organize activities and uses. After categorizing the activities, we can locate these areas for various uses on the plot plan.
Try to provide enough space for each activity within a given use area. Using another overlay sheet of tracing paper taped over the plot plan, note these use areas. Drawing bubbles to indicate use areas on the overlay helps to loosely define spaces for each activity Figure 19� The public use area is usually in the front of the house.
The private use or family area is often in the back of the house. And the service area is generally in the backyard or side-yard.
It is important to locate and then develop each area so that it meets user needs, contributes to an attractive overall landscape, and addresses environmental factors identified in Step Two.
The public use area is most often seen by passersby and guests and usually includes the front yard, drive, walks, and main entrance to the home. A first consideration is to direct visitors to the front door. This can be accomplished with several landscape features. First, consider the front walk. The front entrance can be enhanced by a walkway with an interesting surface texture, such as brick, slate, concrete pavers, aggregate, or stained concrete Figure 19� Outdoor lighting improves safety and directs pedestrian traffic to the entrance after dark.
Low, indirect lighting can safely light paths. Municipalities and other government agencies are moving toward decreasing light pollution. For these reasons, incorporate appropriate light schemes into the landscape, including down-lighting of specimen plantings and hardscape.
Another environmentally sustainable solution is solar lighting. To help guide visitors to an entrance area add a focal point; for example, an interesting tree with ground cover underneath or a planter with a specimen shrub. Trees, shrubs, and grass can be used to focus attention on the entryway.
Hardscape elements, including rocks, planters, trellises, arbors, and water features can also draw focus to the entryway. Vehicle parking needs to be considered. Allow enough room for a door to swing open and a surface where someone exiting a vehicle can stand.
When planning the foundation areas, consider the mature size, color, texture, and number of plants needed. Consider the individual character of a plant so that as it matures it grows without major maintenance. Modern house foundations are often attractive and do not need to be hidden by dense borders of plant material.
If trees are desired near the house structure, choose a tree with a small canopy when fully grown so the branches do not interfere with the porch or roof. Placing tall trees in the backyard, and medium or small ones on the sides and in front, highlights the house Figure 19� Examples of small canopy trees are dogwood Cornus florida , Japanese flowering apricot Prunus mume , Japanese maple Acer palmatum , eastern redbud Cercis canadensis , sourwood Oxydendron arboretum , and serviceberry Amelanchier species.
Tree-form evergreen shrubs are also useful, such as yaupon holly Ilex vomitoria , camellia Camellia japonica , inkberry holly Ilex glabra , or wax myrtle Myrica cerifera. The goal is to enhance the total visual effect while not blocking doors or windows or creating future maintenance issues from either plant root systems or branches and foliage.
While a front lawn is a very common feature, consider reducing the amount of area planted with turfgrass. Unless there are designated uses for a turf area in the front yard, the costs, labor, and chemical inputs often involved in maintaining a lawn can be avoided by planning a turf-free front landscape.
Incorporate masses of ground covers or mulched areas in the front landscape to create interesting lines. A front yard without a lawn can be beautiful and inviting, more easily maintained than a lawn, and contribute to a sustainable, environmentally friendly landscape Figure 19� When designing areas to be used privately by the family, refer back to the needs identified in Step 3.
So decks, patios, and terraces should be considered an integral part of the residential landscape. The outdoor living areas should be easily accessible to the indoor living and kitchen areas of the home and should include private areas with attractive views.
Hot tubs, swimming pools, plant containers, raised beds for edibles, flower and woody ornamental gardens, water features, and sculptures are features that enhance an outdoor living area. Be sure to include space for recreation and sports. Some families enjoy basketball, tennis, or swimming, which requires special planning. If adding a large recreational feature like a tennis court or a swimming pool is not affordable with the initial landscape installation but is desired for the future, be sure to leave enough space in the private use area.
The needs of children for landscape space should also be considered Figure 19� Sandboxes, swing sets, playhouses, and toys should be located in the family activity area.
Because play spaces are generally placed in major sight lines from the house, they are ideal for future focal points, such as a water feature or specimen plant. Every residential landscape requires an area where gardening equipment, garbage cans, firewood, bicycles, and other items can be stored.
Often these items end up at one side of the garage, behind the back porch, or under the deck. Set aside a certain amount of space for these necessities. Try to provide space for an outside utility building that is easily accessible Figure 19� Remember to keep the back of the site accessible to vehicles. Access facilitates major landscape maintenance tasks like tree removal or the addition of new landscape features, such as a concrete patio or a swimming pool.
If desired, spaces for gardening such as a greenhouse, beds for vegetables, or a compost pile can be provided in this area. As noted above, however, edibles can be integrated into the private use areas. If unsightly utility areas are visible from the house or patio, a screening wall or hedge may be needed Figure 19� Do not forget to screen off unsightly areas from the neighbors. A side yard is often the location for house utilities, including electricity and natural gas meters, cable access, or air-conditioning units.
Homeowners do not typically spend a lot of money on their side yards because they do not spend a lot of time there. These utilitarian spaces can still be incorporated into the overall landscape at little cost by using attractive, functional access paths and screening materials. Be sure to keep plants and any screening structures away from utilities, both for ease of maintenance and to ensure good air flow.
A bubble diagram helps loosely define activities and traffic flow in a landscape. The arbor and low growing heather are inviting features leading visitors directly to the front door on this flagstone walk way.
This Japanese maple with a modest canopy is the right scale for this small front yard. This beautiful front yard incorporates ground covers like phlox, perennials like rosemary and shasta daisies, and tulip bulbs to replace the lawn. These children are enjoying a natural play space made from tree rounds.
A garden shed can be attractive as well as functional. It is the ideal place to store garden tools and potting supplies but it can become a feature in the landscape as seen here with the cut-end logs decorating the walls. The yellow star jasmine Trachelospermum asiaticum growing on this trellis not only provides a wonderful fragrance, it successfully screens the view to the neighboring patio.
Once the site has been analyzed, the activity wish list made, and bubble diagrams drawn Figure 19�35 to best locate the activities and elements, the landscape layout can be determined. A landscape can be informal, formal, or a combination of the two.
Informal landscapes tend to have curvilinear lines and winding paths. Formal landscapes have more formal planting beds and pathways with rectilinear lines. A combination landscape might have a formal layout, but informal, loose plantings within the framework.
Selecting the overall landscape layout is critical because it helps set the mood and energy of the space. It is important to get the layout right the first time as it can be time consuming and expensive to start over. The overall goal of this step is to get all the pieces of design to fit together like a puzzle so the final landscape, even after multiple installation phases, appears to be a unified, well-thought-out design.
Landscaping guided by a series of arbitrary "rules" such as "always plant shrubs in groups of three or five" and "never plant annuals in the public area" does not consider the needs of individual families and sites. Such landscaping rarely results in good design. Good design does not have to be limited by such so-called rules. Our objective in designing a landscape is not only creating good visual relationships. And a successful landscape promotes environmental stewardship.
Developing a landscape design requires an understanding of the dynamic nature of the landscape. When we create a final design plan, we rely on basic design considerations, environmental design considerations, plant selection guidelines, and plan preparation instructions.
Rhododendrons, azaleas, dogwoods, or other woody ornamentals and herbaceous perennials can be mass-planted in informal beds Figure 19� Try to locate the plants so that a natural scene develops as they mature. Plant the shrubs or trees together in one large bed and mulch well.
Planting woody perennials en masse also provides winter structure for the landscape. Consider adding bulbs or borders that have masses of herbaceous perennials or annuals for seasonal color. If the site analysis reflects a need to screen unsightly views, provide a noise barrier, or create privacy, plant evergreen shrubs or build a fence Figure 19� If room and time allow, a natural evergreen hedge is a good screening option.
Vines on trellises create effective screens in tight spaces. Many trees, shrubs, and vines that make good screens grow very well in North Carolina.
Although deciduous plants lose their leaves in the fall, investigate their stem size and arrangement because a densely branched deciduous shrub can work as an effective and interesting screen even after its leaves have dropped. In selecting specimen plants, consider quality�not quantity. By definition, specimen plants are plants grown alone for ornamental effect, rather than being massed with other plants as are bedding plants or edging plants Figure 19� Specimen plants are located in the design to create focal points and draw attention to a specific area.
We must design for time, or succession, when dealing with living, growing plant material. The initial planting should be based on the mature size of the plants. Although the entire space will not be filled, young, new plants should be placed so they will have space to grow and attain their mature size. Plan for the in-between areas in the newly planted garden so these open areas do not become weed-filled.
One option is regular mulching with an organic material, such as pine fines , shredded leaves, or double-hammered hardwood mulch. All of these mulches suppress weeds, look attractive, conserve moisture, and protect and build healthy soil. Gaps can also be filled temporarily with annuals for a few years as long as they do not overcrowd or compete with permanent plantings.
Plants become overcrowded and compete for water and nutrients. Stressed, overcrowded plants are more susceptible to depredation by insects and plant diseases. Pests lead to unattractive, maintenance-intense plants that eventually need to be removed because they are unhealthy.
Residential landscapes are part of a larger landscape and ecological community. We consider reducing energy, water, and material inputs, and avoid the use of toxic or prohibited materials.
The following environmentally friendly design techniques and considerations are based on valuing ecosystem services in the landscape. Traditional landscape designs often incorporate the removal of all water offsite as quickly as possible. In an ecologically based design, water is not treated as a waste product to be captured and conveyed offsite.
Instead, we view water as a resource to be captured and used in the landscape. The idea is to balance water inputs from precipitation, surface flow, and piped-in sources with outputs from evapotranspiration, runoff, and water that infiltrates into the soil. This balance helps prevent negative environmental effects such as erosion and surface and groundwater pollution. We rely on the following design techniques and concepts to achieve water conservation and balance:.
Incorporate other design practices for water conservation that use water efficiently in the landscape:. Applying good design practices to conserve water in the landscape also conserves the energy that would have been required to provide that water.
Landscape plants provide shade protection from radiant heat , minimize air movement insulation , and cool the air through transpiration release of water from leaves which then evaporates, a process that consumes energy and results in heat reduction.
The passive energy-conserving impact of a plant species depends on its size, whether it is deciduous or evergreen, the shape of its canopy, and the density of its foliage.
Trees, shrubs, and vines are all effective, although arbors or trellises have to be included for vines or to espalier shrubs and trees. Locate deciduous trees where the greatest benefit is derived from summer shade and winter sun�on the western side to protect the home from noon to sunset.
There is also some benefit to planting on the eastern side to protect from sunrise to noon. Shade not only structures but also outdoor seating areas, walls, and hardscapes.
Pay particular attention to shading windows, which are most vulnerable to heat gain. Shading air conditioners can reduce the air temperature inside the home, but be sure to allow for adequate air flow around the unit. Use trees to shade the walls rather than the roof of the house.
Tree limbs over the roof shed litter that clogs rain gutters. If heavy limbs fall during a storm, they can damage the house.
Create a windbreak by identifying the prevailing winter wind and installing evergreen trees upwind from the house. One row of trees is effective, but a windbreak of up to five rows that includes several different species is more effective. The windbreak also serves as a privacy screen.
A biodiverse windbreak or screen consisting of native plants also provides sources of food and shelter for beneficial insects and wildlife, including birds. Do not over-plant! Too many trees and shrubs near the house can cause moisture problems that lead to mildew, mold, and high humidity. The wind and the sun should periodically dry the area around the home.
Over-shading a home may result in higher energy and maintenance bills because lights have to be used more often and an air conditioner may be needed to control humidity.
Combining these landscape ideas with proper insulation and conservation habits should produce a significant decrease in energy consumption.
Landscapes are ecosystems. Ecosystems require a diversity of plants in various layers or levels to provide adequate habitat for wildlife. Consider including a water feature with shallow edges to provide drinking and bathing water for wildlife. Selecting native plants helps to attract birds, pollinators, and beneficial insects to the yard.
See chapter 20, " Wildlife ," for specific tips on attracting and managing wildlife in the landscape. Incorporating edibles into the entire landscape instead of only in a vegetable garden is a way to make the landscape more eco-friendly.
Doing so also makes more efficient use of space by incorporating plants that perform multiple functions add beauty to the garden, provide food and cut flowers, and attract pollinators.
It is not necessary to substitute edible plants for all ornamentals, but many edible woody landscape plants have high ornamental value. The goal is to progress from the typical backyard vegetable garden and develop a plan that uses edible plants to solve functional landscape problems. Plan for year-round harvest by selecting a variety of plants that ripen at different times throughout the year. Edibles are available that meet most plant selection design criteria.
For trees, consider fruit and nut trees. Most deciduous fruit trees including apple, fig, pear, cherry, peach, and plum come in a variety of sizes ranging from a mature height of 8 feet to a mature height of 30 feet.
Select one to fit the space. Be sure to provide adequate sunlight as fruit trees require 6 to 7 hours a day. For seasonal color, instead of purchasing annual flowers consider colorful vegetable plants. The bright stems of rainbow chard spruce up any planting bed.
Kale comes in many varieties that have interesting colors and textures Figure 19� Instead of planting ornamental ground covers, think about planting strawberries or evergreen raspberries. An area with well-drained soil that receives at least 6 to 7 hours of direct sunlight produces strawberry plants with lush green foliage, spring blossoms, and early summer fruit.
Rosemary, thyme, oregano, lavender, and many other herbs offer a variety of design options. Some are evergreen, some are shrublike, some create creeping ground covers, and all have colorful blooms and unique fragrances. Blueberry bushes are a good substitute for a privet Ligustrum sp. Rabbiteye cultivars are more widely adapted to different soils than highbush cultivars.
Rabbiteye blueberries do not tolerate the cold climate of the mountains but grow well in full sun all across the NC piedmont and coastal plain. Acid soil with a pH of 4. Include two or more cultivars in the design to ensure proper pollination. To make the landscape more efficient and less frustrating to maintain, consider these design suggestions:. If wildfire is a potential problem, create at least a foot defensible space around the house more if the house is on a slope or if the surrounding vegetation is particularly flammable by removing flammable material from the area surrounding the building.
Identify the prevailing wind, which is the direction from which the fire is most likely to approach. Be sure not to design storage for firewood, building materials, or other flammable landscape materials on that side of the yard. Remove any dead vegetation within the defensible space. Eliminate fuel ladders, plants of varying heights located near each other, which provide a means for the fire to jump to the canopy.
Leave open space between plants or groups of plants within the defensible space. Do not plant within 5 feet of any structure or use dense masses of plants. To learn more about Permaculture, another ecologically based approach to landscape design see Appendix G.
Plants are the dynamic heart of a landscape, and thoughtful plant selection is essential to developing a beautiful, earth-friendly landscape. Proper plant selection and placement create an appealing landscape, improve property value, beautify the community, and build a healthy local ecosystem.
Selecting the right plant for the right place reduces the need for irrigation water, fertilizer, herbicides and pesticides, and labor. Plants can be selected for their aesthetic or ecological value to fulfill specific functions such as screening or noise control.
Plants are incorporated into the design to fill several visual and sensory roles in the landscape. Plants form a structural framework for the garden and yard, establish horizontal and vertical diversity and transition, and provide focal points. They can be used for screening and creating seasonal impact with foliage, bloom, twig color, or trunk architecture. Many plants add fragrance to the environment. Selections based on ecological value can reduce lawn area, control erosion, and add biodiversity by attracting, hosting, and feeding pollinators, beneficial insects, and other wildlife�including birds.
Native plants or cultivars of native species benefit the local ecosystem in a myriad of ways including by supporting insects, the primary food source for nesting birds and other native fauna. In addition, they attract native pollinators, including birds, bats, butterflies, bees, and moths as well as providing preferred food, shelter and habitat for wildlife.
Native plants also enhance the beauty of all types of gardens�from formal to informal designs and provide a sense of place and regional history. An extensive variety of native plants occur in North Carolina and they can be used to incorporate elements of local natural systems. See chapter 12, " Native Plants " for more information. There are also a variety of non-native ornamental species that thrive in North Carolina.
For example, choose drought-resistant or low-moisture plants for a location with limited available water. Or select a mounding, low-growing broadleaf evergreen for a low hedge next to a walkway.
Plant tags at nursery centers also provide environmental information. For the most accurate, research-based information on specific plants, use plant databases from credible websites such as the NC State Extension Plant Database at NC State University or other university extension programs as well as books by reputable horticulturists, botanists, and ecologists.
Key design factors to consider in plant selection include plant growth habit, mature size, bloom cycle, and seasonal interest. Texture, form, shape, and size are physical characteristics of plants that provide interest, variety, and aesthetic appeal in a landscape. Based on these characteristics, some plants have more visual value in relation to the surroundings. Some are more functionally dominant, and some dominate simply by size.
Select plants with upright forms and coarse textures for high visual impact. Low or prostrate forms and fine textures are less dramatic and have lower visual impact. When selecting plants for specific locations in the design, consider that the visual value also depends on the viewing distance, the season, light conditions, and adjacent plant material and structures. Knowing the mature plant size is critical for spacing plantings to accommodate both mature height and width.
Also consider mature sizes of nearby plants and distance from any nearby structures. Plants near buildings should be located half their mature width plus a minimum of 1 foot away from the structure. Choose plants that have the desired mature size versus one that requires constant pruning and maintenance to keep it the desired size.
Choose plants with different bloom cycles and foliage color to provide year-round color and to attract pollinators. Flowering trees provide pastels in spring. Beds of perennials and annuals furnish vivid hues in summer, and hellebores offer bursts of color in late winter. Many plants have more attractive foliage than flowers. In addition to innumerable shades of green, plants offer leaves of other colors.
Many plants have variegated leaves with multiple colors on each leaf. Some variegated leaves have stripes of different colors usually white, cream, or yellow and green. Others have patches or blotches of color, including combinations of white, cream, or yellow and green; pink, purple, and green; or yellow, orange, red, copper, and green.
To create seasonal interest, consider bloom color and time, foliage texture and color, fruit color and time, and twig and bark texture and color to achieve visual accents in every season. For example, evergreens add winter color and unity.


|
Picture Perfect Landscaping And More Unity Outdoor Kitchens With Traeger Grills Data Landscaping Timber Near Me Eclass Lawn Maintenance Meaning Yahoo |
